

|
Connecting the USB Light Controller to your computer and Illuminated Push Button Switches |

|
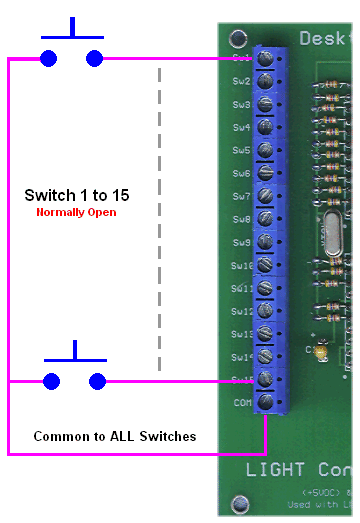
Wiring the 15 Push Buttons to the Board Below is a Schematic on wiring the 15 Normally OPEN Spring Return Push Buttons to the 2250 Board.
As seen above, one terminal of all the switches is Common to all. Connect either of the terminals from all switches together. Then solder a length of wire from any one of the common terminals and attach to the "COM" Screw on the 2250 Board. Next, solder a length of wire to the remaining terminal on all switches. When complete, take this wire from each switch and attach it to the "SWx" Screw on the board. As seen above, these connections are labeled as SW1, SW2, SW3 ....... SW15. |
|
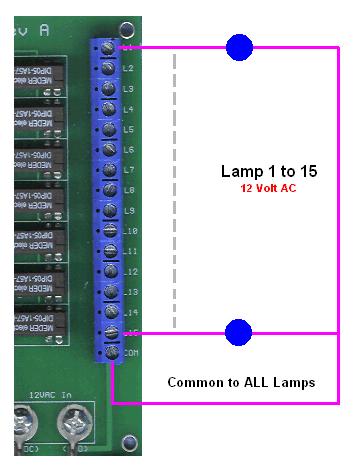
Wiring the Lamps to the Push Buttons With the wiring of the 15 Spring Return Switches to the board complete, it is now the time to wire the corresponding lamp to the switch. This wiring is very simple. Just keep in mind that the Bulbs are activated by the pressing of each push button corresponds to its "Lx" label on the 2250 board. Ex: Switch "SW1"; when
pressed, activates the bulb that is connected to "L1"
Just like the wiring of the switches, the lamps are also wired with one side connected together as a common connection point. This "common wire is then screwed to the "COM" terminal as seen above. NOTE: The "COM" of the switches and the "COM" of the lamps are NOT CONNECTED TOGETHER on the board as a copper trace. These two connection points are NOT INTERCHANGABLE! Connecting these two points will damage your 2250 board! Keep both "COM" side separate! One for the switches and the second for the bulbs! |
|
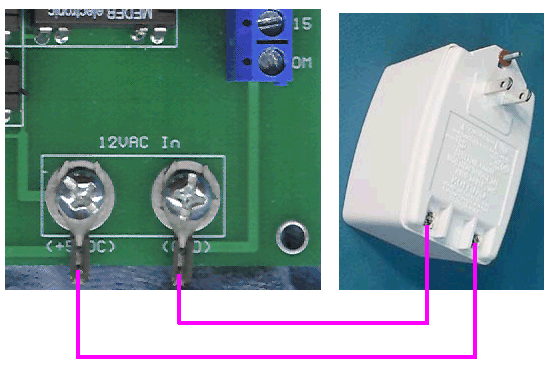
Connecting the Wall Transformer The USB Port of your computer can not supply the needed current to light 15 bulbs. So we need to provide this power from an outside source. For this, we will use a Wall Transformer. The recommend switches available from "All Electronics.com", have an internal bulb rated for 12 volt AC. If you purchase different switches with bulbs needing a higher or lower voltage, you must purchase a Wall Transformer with the required output voltage. A wall transformer with a 12VAC .5 Amp output can handle about 30 light bulbs. If you plan on using multipal 2250 boards, .5A is a good choice. Wall transformers are a common item that can be found in all electronics parts stores and online for about $3.00 (USD). Your 2250 board was supplied with two "Spade Lugs" already attached to the terminals where the wall transformer is to be connected too. Using a screw driver, remove the Spade Lugs from the board. Strip the insulation from both leads on the Wall Transformer and solder each lead to one of the Lugs. Soldering Flux might be needed for a secure connection. Seeing that there is no polarity to an AC voltage, you can take either wire from the Wall Transformer and fasten it down to the screw terminals on the 2250 board. Do so for the remaining wall transformer lead. In the photo below, the Wall Transformer does not have any wire leads but 2 screw terminals. If you purchased this type of Transformer, you would need to supply your own leads. A good choice is a wire called "Zip Cord". This is the same wire used on a common table lamp. A cord salvaged from a broken lamp (or purchased from an electronic supply house) can easily be soldered to the Spade Lugs and also screwed down to the terminals on the wall transformer.
|
|
If you purchase another type of illuminated switch that required a voltage other then 12VAC, just purchase a Wall Transformer with the required AC output. Wall Transformers come in a variety of output voltages; from 1.2VAC to 24VAC and higher. Just remember not to purchase a transformer that the output voltage is higher then the voltage needed to light the switch. Example, if your illuminated switches requires a voltage of 12VAC, a transformer with an output of about 15VAC can be connected. But don't try a transformer with an output of 24VDC. You will surely burn out the bulb. Another type of switch that you might consider using with the 2250 is a spring return push button with an internal LED (Light Emitting Dode). These switches can also be connected to the 2250 but they do have unique requirements that the AC bulb do not. First, a switch containing an LED needs a much lower voltage for operation. Second, the voltage must be DC (Direct Current) NOT AC. And the third requirement, a switch with an LED MUST have a RESISTOR soldered in series with one of its leads. This resistor can about 330 ohms with a 1/4 Watt rating or higher. To use the 2250 for LED operation, you would need to purchase a Wall Trandformer with a voltage of about 5VDC. Seeing that LED require little current to operate, the output watage from the wall transformer can be about 100 to 250mW. Connecting the wire leads from a DC Wall Transformer is the same as its AC counterpart, with one exception. LEDs are a polarity sensitive device, so + and - terminals on the transformer MUST BE OBSERVED.
|
This Page is still Under Construction!
More to Come!


