 Thank you for your purchase of our Model 2015 NAV/COM Radio Panel,
a small redesign of our Popular Model 2010. The Switch Assignments
are involved but can be easily accomplished with the help of the following
information.
Thank you for your purchase of our Model 2015 NAV/COM Radio Panel,
a small redesign of our Popular Model 2010. The Switch Assignments
are involved but can be easily accomplished with the help of the following
information.
If you have any
comments or need additional information on the use of the Radio Panel,
please write me
at:
INSTALLATION
Installing the NAV/COM Radio requires
very little time. All you need is 1 unused USB Port. This additional Port
can be added to your computer by using a device called a USB Hub. These
Hubs can be purchased for as little as $20.00 in the
Internet.
Just plus the USB Cable from the
back of the Radio Panel into the Hub Adapter and let your computer locate
and load the required software for its proper operation. The Radio will be
sensed as "USB Joystick". That's all there is to the
installation.
Programming the
Buttons and Switches
As mentioned earlier, the 2015 does
require the licensed version of FSUIPC. This small .dll program resided
inside the Module File of your FS2002, FS2004 or FS X Flight
Simulator. FSUIPC come is two versions. The FSUIPC 3.75 used for FS98,
FS2000, FS2002 and FS2004. While Version FSUIPC4 is used strictly for the
New FS X Flight Simulator.
Either one of these programs can be
Downloaded Free of charge from:
The Code Key for either program can
be purchased from simMarket (A link to simMarket is also provided at the
FSUIPC site). The code Key costs about $24.00.
When you download the required FSUIPC
program; copy the .dll program to Flight Simulator's "Module"
File. That's it. Now it's time to load and run your Flight Simulator
Program. When running, click on "Create a Flight". When you have a your
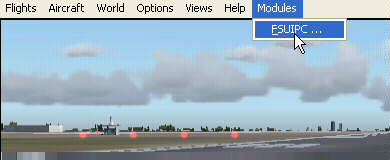
Cessna 172 on the Runway, press the "ALT" key. On the TOP of the screen a
thin white band of extra options will appear. Click on "Modules"; then
"FSUIPC".
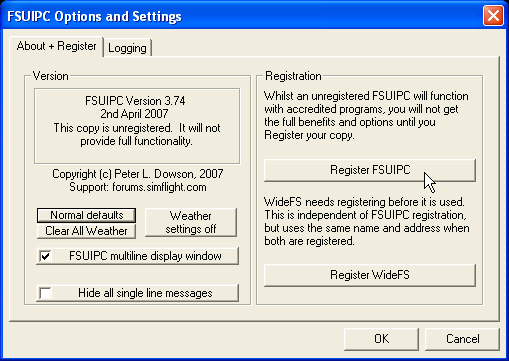
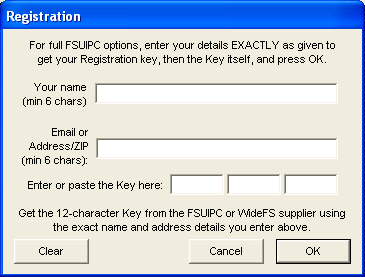
Using FSUIPC for the first time, you
are asked to input your Name, Email Address and the Code Key you just
purchased. When entered correctly, FSUIPC is ready to be programmed for
use with your NAV/COM Radio (Note: After inputting your Code Key, you need
to Restart Flight Simulator so that the Code Key can take
effect.
After reloading your Flight
Simulator program; it's time to Program your NAV/COM
Radio.
Programming the NAV/COM
Switches
With your
copy of FSUIPC Registered; now is the time to program the Radio Panel.
Again, with FS running, hit the "ALT" Key. With the White Band appreaing
in the top of the monitor; click "Modules" then "FSUIPC". With the main
FSUIPC window showing, locate and click on "Buttons +
Switches".
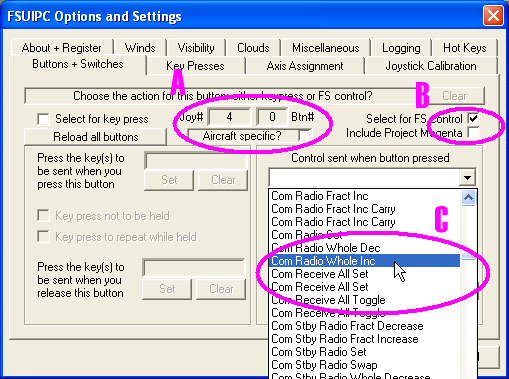
You will
get the window appearing above.
There are three main
sections of this window that require our attention. They are indicated by
the letters "A", "B" and "C". Section "A" shows the Button or Switch that
you press and it's USB Port Location. By pressing other buttons on the
Radio Panel, these settings will change accordingly. "B" needs to be
click. The "Check" Mark needs to remain with ALL Programming. This Check
Mark allows you to choose your button assignments from the FSUIPC listing.
"C" shows all the assignments available that your Radio Panel can be
programmed to.
Now using the TABLE
below, we will program each NAV/COM Switch and Push Button to the needed
functions. As you can see, I've included 2 Tables. Seeing that most
aircrafts have an active radio (NAV/COM 1) and a stand-by (NAV/COM 2).
Table 1 shown the function settings for using 1 Radio, while Table 2 shows
the settings if you have two Radios. At this time, lets consentrate on
Table 1.
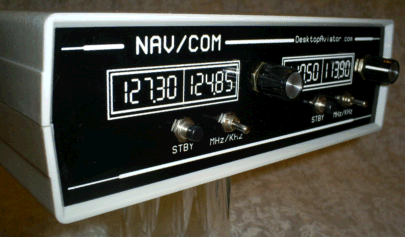
Below is a photo of the
front panel of the NAV/COM Radio. Each Push Button, Toggle and Rotary
Switch is shown by a number. This number (in conjunction with the
information in the Settings Table) will show you the which button would
need to be "Flipped", "Pushed" or "Turned"
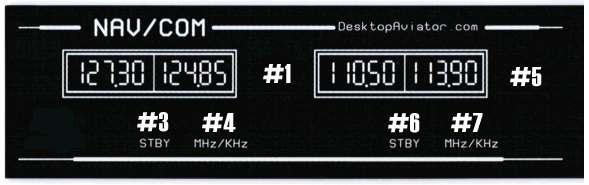 NAV/COM1 Radio
Button Assignments for use with FSUIPC
NAV/COM1 Radio
Button Assignments for use with FSUIPC
| Rotary Switch (SW #1) |
Rotate Clockwise (SW #4 in MHz Position) |
COM RADIO WHOLE INC |
| Rotary Switch (SW #1) |
Rotate Counter-Clockwise (SW #4 in MHz Position) |
COM RADIO WHOLE DEC |
| Rotary Switch (SW #1) |
Rotate Clockwise (SW #4 in KHz Position) |
COM RADIO FRAC INC |
| Rotary Switch (SW #1) |
Rotate Counter-Clockwise (SW #4 in KHz Position) |
COM RADIO FRAC DEC |
| Button #2 |
No Longer
Available |
* * * * * |
| Button #3 STBY |
Press Button #3 |
COM STBY RADIO SWAP |
| Rotary Switch (SW #5) |
Rotate Clockwise (SW #7 in MHz Position) |
NAV1 RADIO WHOLE INC |
| Rotary Switch (SW #5) |
Rotate Counter-Clockwise (SW #7 in MHz Position) |
NAV1 RADIO WHOLE DEC |
| Rotary Switch (SW #5) |
Rotate Clockwise (SW #7 in KHz Position) |
NAV1 RADIO FRAC INC |
| Rotary Switch (SW #5) |
Rotate Counter-Clockwise (SW #7 in KHz Position) |
NAV1 RADIO FRAC DEC |
| Button #6 STBY |
Press Button #6 |
NAV1 RADIO
SWAP |
I'll take you through the first two programming
procedures so you can familiarize yourself with the
operation.
The Table above shows that Button #1
is the Communications Rotary Switch on the Panel. The center column shown
that Switch #4 is to be "Flipped" into its MHz position (to the LEFT). The
third column shows the function we will program the switch
with.
So with your Radio Plugged into the
USB Port and FS running and showing the FSUIPC window, turn Switch #1
"Clockwise". Notice "A" on the "FSUIPC Options and Settings" Window,
it will indicate a USB Port Value and Switch Location. Now make sure
that at "B", you have checked "Select for FS Control". Now click on
"Control Sent when Button is Pressed" ("C"). Using your mouse, run down
the list and find "COM_RADIO_WHOLE_INC" and highlight this setting. That's
it. (If you make a mistake; just click on "CLEAR").
Lets goto the next button.
With SW #4 still in the MHz position;
now we'll turn the #1 Rotary Switch "Counter Click-wise". Note at "A"
there is a new Port Number and Switch displayed. "C" shows a blank window
at this time. Again, using your mouse, click and find in the listing of FS
Settings; "COM_RADIO_WHOLE_DEC".
Continue the programming process for
the remaining switches.
NAV/COM2 Radio Button
Assignments for use with FSUIPC
UPDATED Sept 3
2007
| Rotary Switch (SW #1) |
Rotate Clockwise (SW #4 in MHz Position) |
Com Stby Radio Whole
Increase |
| Rotary Switch (SW #1) |
Rotate Counter-Clockwise (SW #4 in MHz Position) |
Com Stby Radio Whole
Decrease |
| Rotary Switch (SW #1) |
Rotate Clockwise (SW #4 in KHz Position) |
Com Stby Radio Fract
Increase |
| Rotary Switch (SW #1) |
Rotate Counter-Clockwise (SW #4 in KHz Position) |
Com Stby Radio Fract
Decrease |
| Button #2 |
No Longer
Available |
* * * * * |
| Button #3 STBY |
Press Button #3 |
Com2 Radio Swap |
| Rotary Switch (SW #5) |
Rotate Clockwise (SW #7 in MHz Position) |
NAV2 RADIO WHOLE INC |
| Rotary Switch (SW #5) |
Rotate Counter-Clockwise (SW #7 in MHz Position) |
NAV2 RADIO WHOLE DEC |
| Rotary Switch (SW #5) |
Rotate Clockwise (SW #7 in KHz Position) |
NAV2 RADIO FRAC INC |
| Rotary Switch (SW #5) |
Rotate Counter-Clockwise (SW #7 in KHz Position) |
NAV2 RADIO FRAC DEC |
| Button #6 STBY |
Press Button #6 |
NAV2 RADIO
SWAP |
Using your NAV/COM
Radio
With all your switches programmed as
shown above; press the "OK" icon. All settings will be saved inside your
FS files. And the FSUIPC window will disappear.
First press abutton or click on the
Radio Icon to DISPLAY the Radio Panel on the computer
monitor.
With the Radio Stack displayed, we
can now adjust the radio frequencies via your new NAV/COM Panel instead of
click on the dreaded mouse. Flip switch #4 to the left (MHz) and turn SW
#1 Clockwise. Note that the WHOLE Number on the Left side of the Radio
Stack will go UP (118.00 ect). Continue to turn
the Rotary Switch and test all 12 positions. By turning
the Rotary Switch (#1) Counter Clock-wise; the same group of numbers will
decrease in value (XXX.00
KHz).
Flip SW #4 to KHz position (right).
Now you are able to increase or decrease the KHz value of the Comm Radio
(118.XX ) just by turning the Rotary Switch
either to the left or to the right.
To "Flip" the Com Frequencies that we
just set from Standby to Active; just push the "STBY" Button (SW #3).
The Standby frequencies (just set by you) will by transferred to the
"Active" side of the Radio.
If this setting is adjusted for ATIS,
you will now hear the Terminal Information from your speakers. To hear the
Tower and get the needed "Clearance" for takeoff; adjust your radio to
"Tower Frequency" and press the "STBY" button. The ATIS will now be
replaced by Tower chatter. Gee; now you know the importance for a second
NAV/COM Radio.
The Navigation Radio (right side of
Panel) will operate in just the same way as the Communications Radio (left
side of Panel).
Please note that FSUIPC places a 1/4
second delay between pressing a button and seeing results on your Monitor.
So rotating SW #1 and SW #5 F A S
T will have NO Effect on the frequency display. Slow
rotation of the Rotary Switch is more desirable then speeding through the
dial. Besides, racing through the settings will shorten the life of the
rotary switches.
Purchasing Information can be
found HERE;

hit
counters
|